General Questions
You won't find CalcWood on Google Play or the App Store, but you don't need it there. You can install it straight from your browser: you get an icon on your desktop or home screen and the calculators open in their own window like a regular program. You always have the latest version.
💻 Computer (Windows, Mac, Linux)
Google Chrome: click ⋮ in the top right → Cast, save, and share → Install CalcWood. You can also click the install icon on the right side of the address bar.
Microsoft Edge: click ⋯ in the top right → Apps → Install this site as an app.
Safari on Mac: in the File menu → Add to Dock.
📱 Phone and tablet
Android (Chrome): tap ⋮ in the top right → Add to Home screen → Install.
iPhone and iPad (Safari): tap the Share button (square with an arrow) → Add to Home Screen.
💡 License: on a computer and on Android you stay logged in inside the app just like in the browser. On iPhone and iPad the home screen app has its own storage, so enter your license key there once more. Menu names may differ slightly depending on your browser version. Firefox on desktop does not support installing web apps.
If you are unsure about any input fields, look for the small yellow question marks next to them. These are helpful tooltips. Just hover your mouse over the question mark (or tap it on mobile) to see a detailed explanation of what the specific value means. I highly recommend checking these tooltips before using the calculator.
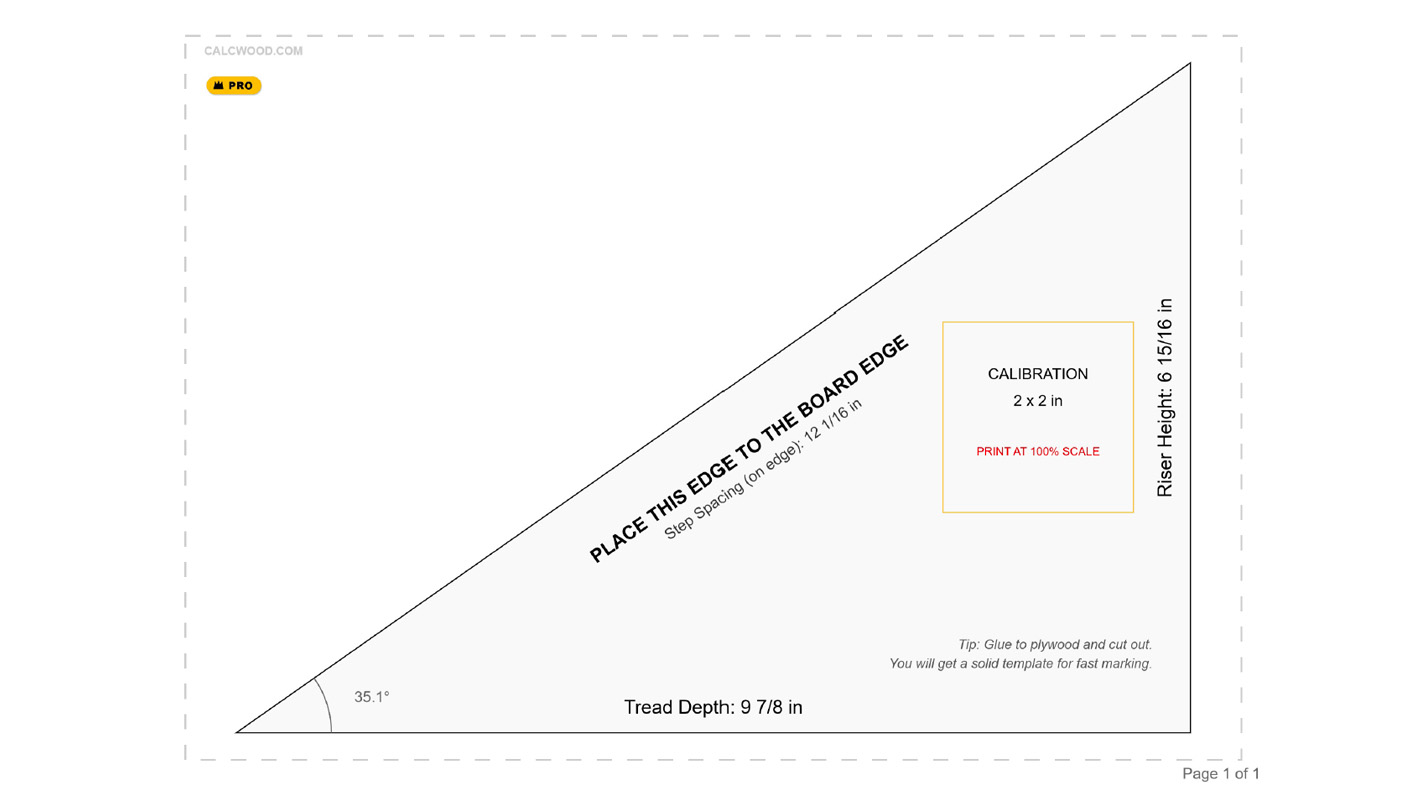
When printing from your PDF viewer, make sure to select "Actual Size" or "Custom Scale: 100%". Do not use "Fit to Page" or "Shrink to Fit", as this will distort the dimensions.
Yes, the whole design is free in every calculator, including the advanced settings. Enter your own dimensions, materials and advanced options and you get the result, the preview and the 3D model. I never lock your inputs or the main design result. There is nothing to install and you do not need an account or registration – the calculators run directly in your browser on a computer, tablet or phone. The optional PRO licence is for the moment you head to the workshop: it unlocks the values marked PRO (manufacturing dimensions, positions and drilling), cutting plans, 1:1 templates, the complete PDF and saved projects. You sign in with a licence key, no password needed. You can see which values are PRO in the results and drawings before you buy, so you know exactly what you are paying for. Calculators marked BETA have PRO features unlocked for free during testing.
Yes. The “Copy Link (URL)” button creates a link that contains all your inputs. Anyone who opens it sees the same calculation, and you can return to it at any time. Saving to a personal project archive and calculation history is part of PRO.
PRO License, Account & Payments
The PRO license unlocks all current calculators and other features I continuously add to CalcWood. Design and settings are free. PRO unlocks every value marked with the PRO badge (production dimensions, drilling and positions), cutting plans, 1:1 templates, complete PDFs and saving projects to your archive. You can find all details on the Premium Access page.
After you sign in with your license key, that browser will remember you for up to 365 days from your last visit. You will only need to sign in again after logging out manually, deleting cookies, your license expiring, or using a different browser or device. In private or incognito mode, the sign-in is automatically removed after all private windows are closed.
The key arrives by email right after payment (check your spam folder too). Open any CalcWood page, click My Account in the menu (the person icon) and then I already have a License Key. You will find the same field on the Premium Access page and in the PRO purchase box in every calculator. Paste the key copied from the email rather than typing it. The invalid or expired key message appears for any key that does not match exactly, so it is almost always a typo.
No problem, I’ll send it again. Click My Account in the menu (the person icon), then I already have a License Key, and below the key field click Key not at hand? I’ll email it to you. Enter the email address your key was sent to when you bought it and I’ll send the key again right away (check your spam folder too). The same link is also in the PRO purchase block in every calculator.
First, run several free calculations and make sure the input workflow and results suit you. Try your own settings too – they are free. Values unlocked by PRO are shown right in the results and drawings, marked with the PRO badge. This lets you check exactly what PRO brings to your project before purchasing, and I recommend buying a license only after doing so.
The PRO license is intended for one user. You can keep your account active on up to 5 of your own devices, such as your phone, a workshop tablet, and your home computer. Sharing the license with friends or using it for multiple people in a company is not allowed.
Quarterly and yearly subscriptions renew automatically at the end of each paid period. You can stop future payments at any time in My Account using the "MANAGE SUBSCRIPTION AND INVOICES" button; PRO stays active until the end of the paid period. The 48-hour pass is a one-time payment and does not renew.
Payments are processed by the secure Stripe checkout. Payment methods: card (Visa, Mastercard), Apple Pay, PayPal, Google Pay, Klarna, Revolut Pay and Link. Your licence key arrives by email right after payment.
Yes. You can cancel your subscription at any time through My Account. Your PRO access remains active until the end of the period you have already paid for.
Your calculation history and saved projects are not automatically deleted when PRO access ends. They remain linked to the email address used for the purchase. If you reactivate PRO later with the same email address, your previous data becomes available again after you sign in. Data linked to a different email address is not transferred automatically.
Yes. If you send a result to your email and later activate PRO with the same address, those calculations appear in your history after you sign in. You can prepare a project in advance and pick it up right after purchase. The link works only through the email address. Calculations you did not email, or emailed to a different address, are not transferred.
Yes. Open My Account and select "MANAGE SUBSCRIPTION AND INVOICES". This opens the secure Stripe customer portal, where you can download the relevant payment documents.
Company purchases with a VAT number are currently available only to customers in the Czech Republic. Everywhere else, PRO is bought as a private person without a VAT number. Everything works exactly the same, the invoice just will not show company details.
Because this is a digital service that unlocks immediately after purchase, please try the free features first and make sure the calculators suit your workflow.
Lumber calculator New
Yes. In step 2, enter the offcuts you have (count, thickness, width, length). The calculator cuts what it can from them and only then plans what to buy for the other parts. The shopping list, cut list and PDF all show what comes from offcuts and what you buy.
With PRO, save your offcuts in My wood in My workshop. On every calculation the calculator checks them, and when some fit your parts it offers them with one click. After cutting, one button removes the used pieces and adds the new offcuts. Pieces shorter than the smallest useful offcut count as waste.
Yes. Below the result there is Download Excel (parts, shopping list and cut list on separate sheets). With PRO you also get part labels for an A4 sheet of 24 labels 70 × 37 mm: each piece gets its number, name, size and the board it comes from.
List your finished parts. Add the saw kerf and end trim to each one. Then lay the parts out on the lengths your store sells, so every part sits whole on one board. The number of boards you end up with is what you buy. The calculator does this for you: enter the parts and the store lengths and you see the board count and the offcuts.
Most board foot calculators only give you volume, and cut list optimizers want you to enter the boards yourself. This one starts from your finished parts and suggests how many boards to buy in store lengths and how to cut them, plus volume, cost and weight. The calculation is free, the shopping list and cut list are free for up to 10 different parts.
A list of which parts you cut from which board, and in what order. The calculator builds the cut list for you: for every board it shows the parts, the kerfs and the offcut, so in the shop you just measure and cut.
Multiply thickness in inches × width in inches × length in feet and divide by 12. A 1″ × 6″ board 8 feet long is 1 × 6 × 8 / 12 = 4 board feet. The calculator above does it for your whole list and adds waste.
5.33 board feet. Softwood stores count from the nominal size 2″ × 4″, even though the stud really measures 1 1/2″ × 3 1/2″.
Hardwood is tallied before planing, thicknesses under 1″ count as 1″ and the area is rounded to whole square feet (NHLA rules). Open “Why did they charge you more?” under the results.
1 board foot = 0.002359737 m³ (144 cubic inches). Multiply board feet by 0.00236 to get cubic meters. The other way: 1 m³ ≈ 423.8 board feet.
| Board feet | Cubic meters |
|---|
| 10 BF | 0.024 m³ |
| 50 BF | 0.118 m³ |
| 100 BF | 0.236 m³ |
Price per linear foot = price per board foot × thickness″ × width″ / 12. A 1×6 has 0.5 board feet per linear foot, so at $8 per board foot a linear foot costs $4. The other way, divide the linear foot price by that number. The calculator takes the price per board foot, per linear foot or per piece, enter it exactly as listed.
It depends on the species. I use specific gravity at 12 % moisture content from the USDA Wood Handbook (FPL-GTR-282). Green lumber is much heavier.
| Species | lb per board foot | kg per m³ |
|---|
| White oak | ≈ 4.0 lb | ≈ 762 kg |
| Red oak | ≈ 3.7 lb | ≈ 706 kg |
| Hard maple | ≈ 3.7 lb | ≈ 706 kg |
| White ash | ≈ 3.5 lb | ≈ 672 kg |
| Black walnut | ≈ 3.2 lb | ≈ 616 kg |
| Black cherry | ≈ 2.9 lb | ≈ 560 kg |
| Yellow-poplar | ≈ 2.4 lb | ≈ 470 kg |
| Southern yellow pine (loblolly) | ≈ 3.0 lb | ≈ 571 kg |
| Douglas-fir (Coast) | ≈ 2.8 lb | ≈ 538 kg |
| Western redcedar | ≈ 1.9 lb | ≈ 358 kg |
No, here I handle boards and beams lengthwise (one dimension). Cutting sheet goods is a separate topic.
No, this calculator is for sawn lumber: boards, beams and battens. Firewood is sold by the cord, which includes the air between the pieces, and log volume uses a different formula based on the log diameter.
Stairs Calculator
You probably forgot to shorten the first step. The bottom cut of the stringer must always be shortened by exactly the thickness of the tread. The calculator deducts this value automatically so all steps end up the same height after the treads are installed.
The throat is the narrowest part of the stringer left after cutting the notches. For standard interior loads, carpenters recommend keeping at least 115–120 mm of solid wood. If the throat is narrower, the material might not handle the load and could crack. For load-bearing or public stairs, always consult a structural engineer.
The basis is Lehman's formula (ideal step): 2x riser height + 1x tread depth = approx. 630 mm (24.8"). The riser should be 170–180 mm, the tread 270–290 mm. If you go above 200 mm for the riser, the stairs become very steep. The calculator monitors ergonomics automatically.
Yes. The calculator provides two design methods. Automatic mode calculates the effective tread depth from the total rise, ergonomics, and available run. Fixed Depth mode lets you enter the overall physical tread board depth, including the nosing. The calculator subtracts the nosing to determine the actual stringer going and checks whether the complete staircase fits within the available run. If it does not fit, the calculator keeps your board depth unchanged and shows the required run instead.
When planning, don't forget your head! The vertical distance between the step edge and the ceiling above it should be enough so you don't hit your head when walking down – usually, at least around 2100 mm (82.7") is recommended for comfortable clearance.
The overhang (usually 20–30 mm) increases the total tread area. On steeper stairs, it significantly helps when walking down, as the heel has more room to step safely.
Yes. Enter the total floor-to-floor height and the maximum length the stairs may take up. Using Blondel’s rule, the calculator proposes the number of steps, the riser height and the tread depth, and shows a drawing of the stringer. If the ideal step does not fit the space, it reduces the tread depth and warns you that the stairs will be steeper.
Yes, and for free. You choose the stair type right at the top above the form. The calculator splits the risers into two flights with the same riser height, works out the landing and prepares two different stringers – lower and upper – including the dimensions of their ends at the landing. Landing depth, flight width, gap, beam, number of risers in the lower flight and joint type can be fine-tuned in the advanced settings (PRO); otherwise sensible defaults are used.
After the calculation, it checks how much wood remains below the cut notches of the stringer, whether the stringer is very long, whether the step is comfortable and the pitch reasonable, and warns you if the ideal step did not fit the space. It is an indicative workshop check, not a structural calculation or a building code assessment.
The CalcWood Comfort Index combines riser height, going, stride and pitch into a single score from 0 to 100 and shows what to improve. The code check compares the result with the limits of the selected country’s building regulations; the country is preselected from your location and you can change it. It is an indicative comparison – for permitted building work, the designer and the applicable regulations always decide.
Below the results you will find drawings in tabs: a section with a start detail, a top view and stringer drawings with running dimensions from a single zero. For U-shaped stairs, the lower and upper stringers are separate and there is a detail of the landing joint. The PDF contains all these drawings, a summary of the input, the running dimensions and a QR code that reopens the same calculation.
In the direction of travel the landing should be at least as deep as the flight is wide; if you leave the depth empty, the calculator uses flight width + nosing + riser. Both stringers bear on the landing beam – either on a screwed-on ledger or in a groove in the beam. The joint drawing shows the dimension from the top of the beam to the ledger or to the bottom of the groove. The beam suggestion is indicative; for load-bearing structures, verify it with a structural engineer.
Drawer Calculator
CalcWood Master checks the specific calculated result using fixed rules linked to the entered dimensions and selected hardware. It can highlight drawers that are too wide, unsuitable slide load capacity, or unused space below the drawers, and recommend what to adjust or verify before manufacturing. It is not artificial intelligence and does not replace the final dimension check. It is a practical rule-based check designed to reveal risk areas before you cut the material.
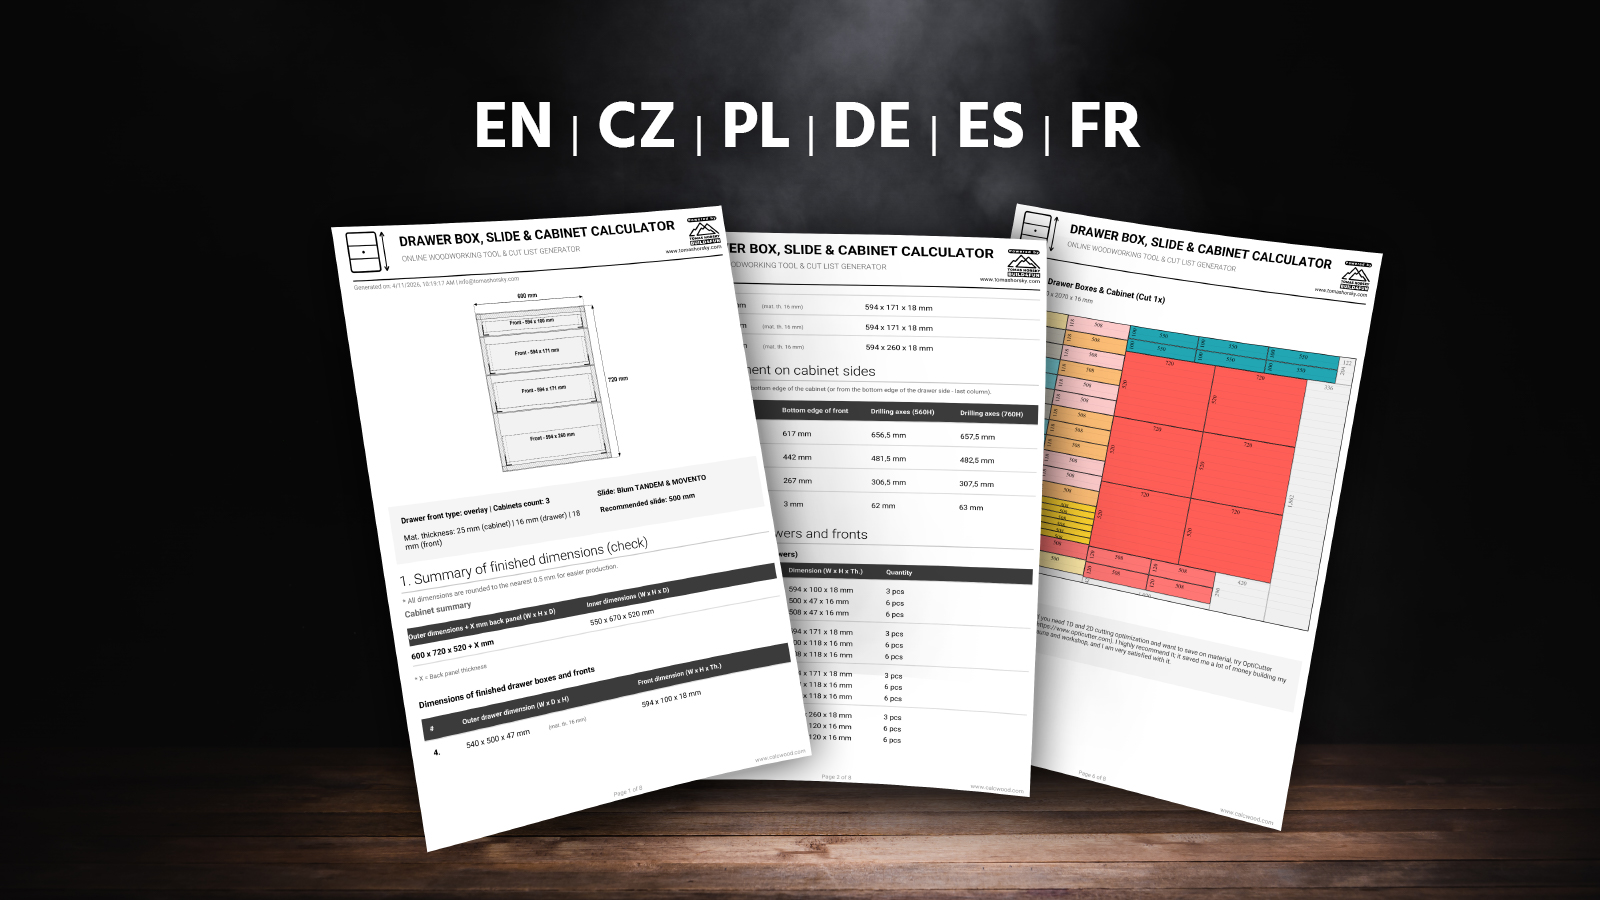
Yes. Below the results you get up to 6 technical drawings: fronts, cabinet with drawer boxes, cabinet side with drilling axes, top view, box section and, for undermount slides, drawer machining (hole for the slide hook, notch in the back panel). All heights are dimensioned from a single zero point – the outer bottom edge of the cabinet – exactly like the drilling table, so you can put your tape measure on and mark right away. They also show the drilling axis on the drawer side, slide clearance, cabinet side thickness and depths including the space behind the drawer. The same drawings are included in the PDF, ready to print for the workshop. Everyone can see the drawings for free; PRO unlocks all production dimensions in them.
The 3D preview is drawn live from your inputs – every change of dimensions, slides, fronts, bottom or cut list settings (full top, stretcher rails, ABS edges) shows up immediately. In Layers you can hide the cabinet, fronts, drawers, bottoms or slides, make the cabinet transparent and play the drawer opening with ▶. Hover a part to see its name and size; clicking a result card highlights the part in 3D. Older devices without WebGL automatically get the 2D sketch.
The groove runs through both sides, the front and the back panel. Width = bottom thickness + 0.5 mm, depth 1/3 to 1/2 of the side thickness, max 8 mm. The bottom is 1 mm shorter per side than the groove depth and at least 10 mm of side should remain above the groove. The calculator uses this for the bottom size in the cut list and PDF and dimensions the groove in the Box section drawing. With Blum the bottom is fixed 13 mm above the lower edge of the sides. There are two common ways to make the back panel: grooved like the other parts (with Blum, notched at the bottom next to the sides for the runner end), or lower, sitting on top of the bottom – then it needs no groove or notch and the bottom slides in from the back. The calculator uses the first option.
If you already have a built cabinet and know the exact inner space (clearance), it's easy. Enter your inner dimensions into the main fields for outer width and height, and set the "Cabinet Mat. Thickness" to 0. This tricks the calculator into not deducting anything, and it will calculate the drawers perfectly for your opening.
Opticutter is an integrated tool that calculates a highly efficient way to cut your parts from a sheet of material. Depending on settings, it also accounts for edge banding and saw blade thickness.
I use a smart deduction system. For drawer fronts, the edge thickness is deducted from all 4 sides (2x thickness). However, for cabinet parts and drawer boxes, it is only deducted from the visible front edges (1x thickness) to maintain the exact lengths required for the hardware.
The calculator handles it. Undermount slides (Blum, Hettich) are made for drawer sides up to 16 mm. If you enter 18 or 19 mm, I keep the box as wide as with a 16 mm side, so the slide and the gap to the cabinet side still fit. The front and back panels and the bottom get narrower by the difference, and the Box section and Drawer assembly drawings show where to rebate the side from below on the inside down to 16 mm (a 2 × 13 mm rebate for an 18 mm side). The manufacturer does not recommend this; it is a workshop practice. The calculator does not allow sides thicker than 19 mm.
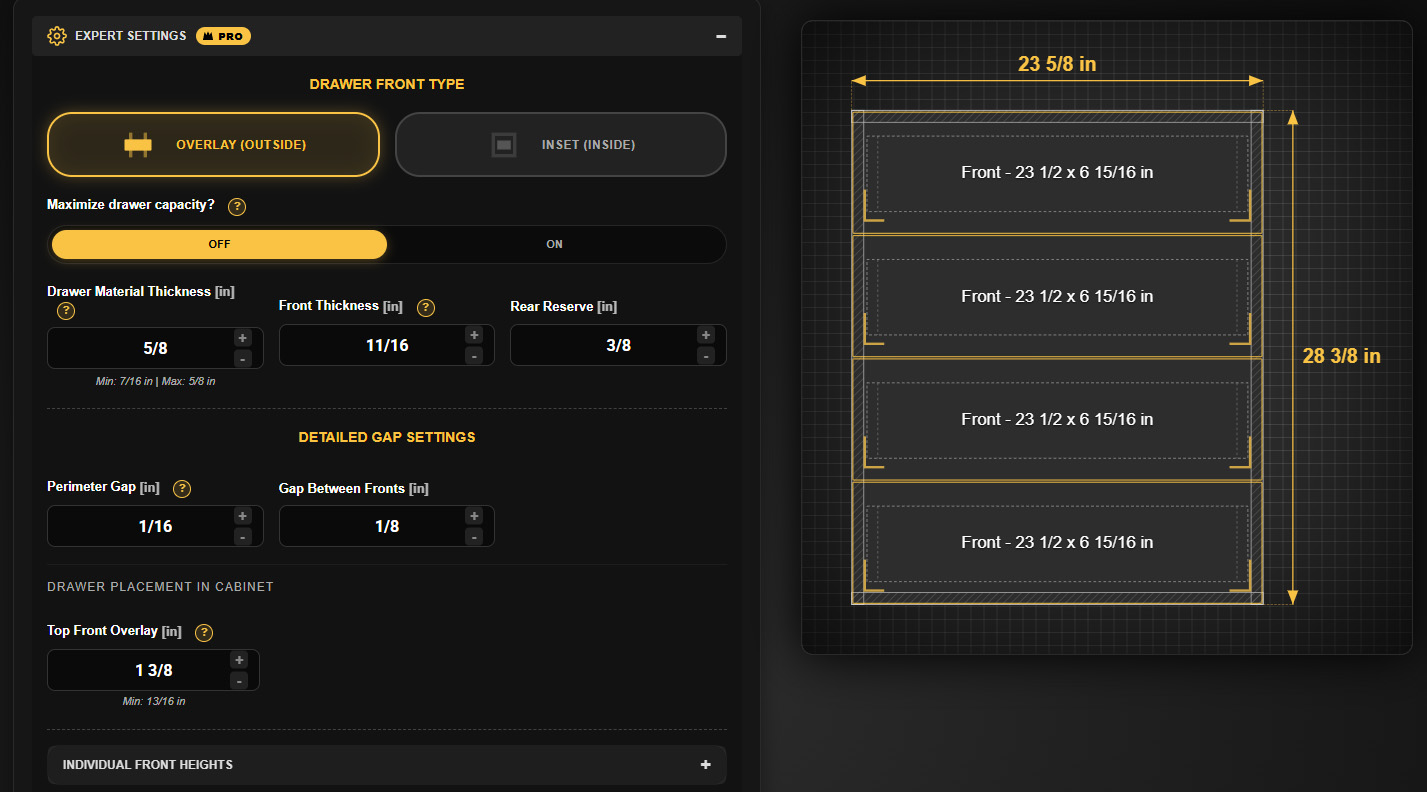
Overlay fronts create a dead space under the drawers. Normally, inner boxes are made the same height for interchangeability. But if you extend them downwards, you get maximum space. The calculator can do this automatically - just select "Maximize drawer capacity" in the Expert Settings.
The most common mistake is poor squareness. Always measure both diagonals when assembling the drawer box. They should be as equal as possible – ideally within one millimeter. The inner cabinet width (LW) also plays a role – if you are off by more than 1 mm, the slides will rub.
The standard gap is 2 to 3 mm. A workshop trick: Take a standard deck of playing cards, divide it exactly in half, and place them on the left and right (or top and bottom). This centers the front perfectly without complex measuring.
Slides are manufactured in standard lengths (usually in 50 mm increments). If you have a non-standard depth (e.g., 470 mm), go for the nearest shorter one (450 mm). Golden rule: the entire drawer with the slide must be 10–15 mm shorter than the inner clear depth of the cabinet so it doesn't hit the back.
An overlay front covers the cabinet edges and easily hides minor inaccuracies. An inset front is flush with the cabinet edge – it looks premium but requires absolutely precise assembly and a perfectly square cabinet.
Yes. In the “Individual FRONT Heights” section, enter the required height for that drawer and the calculator automatically distributes the remaining space between the others. Fronts, drawer boxes and the cut list are recalculated together. Individual heights are part of PRO.
No. Enter how many cabinets you are building in the “Number of Identical Cabinets” field and the calculator multiplies all parts in the cut list by that number. This feature is part of PRO.
Shelf Sag Calculator
Wood-based materials (especially particleboard/MDF) "creep" and deform over time under sustained loads. What looks straight today might sag heavily in 5 years. If your result shows a bad sag, the best trick is to add a vertical stiffening lip under the front edge, or screw the shelf firmly to the sides instead of resting it on pins.
The best trick is to add a vertical stiffening lip (apron) underneath or at the front of the shelf. Another option is to screw the shelf firmly to the sides and back of the cabinet instead of just resting it on shelf pins.
Yes. In the Mounting & reinforcement section you can set fixed mounting and a front or back lip for free and immediately see the sag at installation, after 5 and after 10 years, as well as the strength reserve. The maximum load of a shelf with changed mounting or a lip is part of PRO; for a simply supported shelf without a lip it is free. One click on “Restore the section defaults” brings you back to a completely free result.
Absolutely! The grain must always run along the length of the shelf (from support to support). If you cut the board so the grain runs across, the material's load-bearing capacity will be dramatically lower, and the shelf can easily break under load.
As a practical rule for a shelf that still looks straight, I use a sag of L/200 after 10 years. That means it should not exceed 1/200 of its length (e.g. max 4.5 mm on a 900 mm shelf). The calculator watches this limit and warns you with colour. If you want a perfectly straight shelf, stay below L/300. With more brackets the limit is based on the spacing between them.
Switch to “Calculate maximum load”. The calculator works back to the highest load at which the sag after 10 years stays within L/200 and the board keeps a strength reserve. The result also shows what the chosen mounting can hold. Always go by the lower number.
Besides sag, the calculator also estimates the strength of the board and how long it lasts under permanent load. It warns you when the reserve is close to the limit or when the estimated limit is exceeded. It checks the mounting separately too: shelf pins, brackets and wall anchoring. It is still an estimate, it does not know your exact hardware and wall plugs.
Yes. The 3D view shows three shelves one above the other at real scale: at installation, after 5 years and after 10 or more years. If you can hardly see the sag there, that is good news. In the 2D drawing the sag is enlarged so it is easier to read.
On auto it picks the smallest number that keeps a sensible spacing for the length and load, and spaces them evenly. You can overwrite the number and the offset, the arrow in the field brings auto back. The result shows the spacing and what the most loaded bracket carries.
In the result it adds what the calculation can’t do: how to fix into your wall, which brackets to pick, how to glue a lip or drill pin holes. Advice on safety and on whether the result applies is free, further workshop tips are in PRO. It is a workshop aid, not a structural calculation.
Yes. In damp conditions wood and boards creep more and lose strength, so the same shelf sags more in a garage or outdoors under cover than in a living space. You choose the environment in the Mounting & reinforcement section. Particleboard and MDF do not belong in the damp.
One click sets up a common shelf, such as a bookcase, vinyl records or a workshop rack. The dimensions, material, load and mounting are just a sensible start. The fields you should check are highlighted, so you can adjust them to your needs.
Even Spacing Calculator
A cumulative error occurred. Never measure from piece to piece (from slat to slat). Every millimeter of inaccuracy adds up. The calculator generates continuous running dimensions – you pull the tape measure once, lock it, and just make marks.
In the calculator, you can play with the edge offsets. Set symmetrical edges so that you end up with a full slat or an equal gap on both sides. The visual balance of the start and end determines whether the work looks professional.
It is an absolutely crucial dimension for drilling holes (e.g., for dowels or screws). Center-to-center spacing is often more important in structural joints than the actual gap between the materials.
The calculator has three modes. “I have item count” calculates the gap. “I want a specific gap” calculates the number of items. “I want a specific center spacing” calculates the number of items so that the spacing stays exact, and centres the whole layout.
Yes. Enter an item width of 0 and the calculator will calculate centre positions only, for example for screws, drilled holes, dowels or mounting points. The results, the preview and the PDF then show the centre marks.
In the advanced settings enter the slope angle and choose whether you measure lengths horizontally or along the slope. The calculator works out the layout plus the values along the slope: center-to-center spacing, gap, the item footprint on the sloped edge, the cut angle and the rise. The drawings show a side view and a detail. Quick start offers a Railing profile.
Switch Entered gap (or Entered spacing) to Do not exceed. The calculator picks the smallest number of items that stays within the value and keeps the end items exactly on the margins. Useful for railings, battens, joists, dowels or screws. Always check the actual limit against your local rules and your project.
Six tiles above the calculator (dowels, dominos & screws, slatted wall, fence, railing, deck, joists & battens) prefill typical values from practice. Changed fields are highlighted in yellow, so you can see right away what to adjust for your material. Click the tile again to clear the profile. Profiles are free.
Heat Loss Calculator
The calculator compares the heat loss of the specified structure with and without added insulation. It multiplies the difference by your energy price to show the annual savings. The Return on Investment (ROI) is calculated by dividing the total insulation cost by these annual savings. This gives you an estimate of how many years it will take for the investment to pay off.
Dew point is the temperature at which air moisture condenses into water. If the structure is designed poorly, moisture can condense in sensitive areas and eventually cause mold or material degradation. Properly designed external insulation helps move the risk of condensation outside the sensitive parts of the structure.
Thermal transmittance (U-value) indicates how much heat escapes through the structure. The lower the U-value, the better the insulation. Thermal resistance (R-value) works the opposite way – the higher the R-value, the better the structure resists heat loss.
No. This calculator is for a quick estimate and material comparison (it calculates heat transfer through an ideal structure). In a real house, windows, roof, ventilation, and thermal bridges play a huge role. For official certificates and subsidies, always contact a certified engineer.
Yes. Enter the area that still has no added insulation. The calculator shows the current state and how much energy and money insulating the remaining part would save.
In timber structures, it is crucial how the complete assembly manages moisture and how it can dry. EPS can significantly affect this behaviour, so the design of the entire assembly, its vapour control layer, construction details and workmanship all matter. The calculator warns you not to assess the construction from thermal values alone. It calculates heat loss, not moisture movement, condensation or the safety of the assembly; these must be assessed separately.
Mix Ratio Calculator (Epoxy, Lacquer)
An exothermic reaction occurred. Epoxy generates heat as it cures. A layer that is too thick or a large volume left in a cup can overheat dangerously. Only mix as much material as you can process within the pot life, and stick to the maximum layer thickness according to the technical data sheet.
Never confuse weight and volume ratios! The components (resin and hardener) often have different densities. This means 100 ml of resin might not weigh 100 g. If the densities are entered correctly or available in the database, the calculator will convert it automatically.
You didn't mix it properly. Unmixed material often stays at the bottom and on the sides of the cup. Use the "two-cup rule" – after the first thorough mix, pour the mixture into a second clean cup and mix again. This significantly reduces the risk of sticky spots.
Most often, this is caused by wood moisture or air escaping from pores. The wood should ideally have 8–12% moisture. Before the main pour, always brush the edges with a thin layer of epoxy (seal coat). This seals the wood and significantly reduces the risk of bubbles.
Pot life shortens with volume. A large volume mixed in a cup hardens and heats up much faster than a thin layer poured on a table. Always mix only as much material as you can comfortably process.
Choose the calculation by dimensions and enter the area and pour height. The calculator works out the required amounts of parts A and B from the manufacturer’s ratio. It warns you when you exceed the recommended maximum thickness of a single layer, and for very small amounts it warns that such a batch cannot be mixed accurately.
Choose the calculation by area and enter m² and the number of coats. The calculator works out the amount of both parts. With PRO it also splits the mix into batches by mixing cup size and calculates the cost including waste. While the mix calculator is in BETA, these features are temporarily unlocked for free.
Safety & Responsibility
The calculator works from the values you enter and the rules built into the app, but the old rule "measure twice, cut once" still applies. Always double-check your dimensions before cutting into expensive material. The app is a great helper, but you are responsible for the final cut.
No results found for your search.
 CALCWOOD.
 Premium Access

 Čeština
 English
 Deutsch
 Polski
 Français
 Español