Lumber NewBoard feet, cost and cut list StairsStraight and U-shaped, 1:1 templates DrawersSizes, cut list and drilling Shelf SagShelf sag and load capacity Spacing / SlatsEven spacing and gaps Heat LossHeat loss and payback Smart Mix (2K)Ratios and amounts for 2K mixes
Plans with a 3D model Build-ready PDF and a 3D model in the browser. Browse plans →
The calculators are free. PRO unlocks dimensioned drawings, templates and the full PDF. What is PRO →
ČeštinaCZ EnglishEN DeutschDE PolskiPL FrançaisFR EspañolES
Calculators
LumberNew Stairs Drawers Shelf Sag Spacing / Slats Heat Loss Smart Mix (2K)
CalcWood PRO Support development
Terms of Service Privacy Policy
↑↓ selectEnter openEsc close

    BLACK FRIDAY 50% off your first 3 months of CalcWood PRO Ends in $29 $14.50 Get 50% off
    CalcWood Logo
    CALCWOOD.
    BASIC VERSION – FREE, NO REGISTRATION
    PRO PRO FEATURES ARE OPTIONAL AND PAID

    Wooden drawer runners: drawer size calculator

    Short answer: on wooden runners the drawer slides on strips fixed to the cabinet sides, so the box is narrower than the inside of the cabinet by the runner thickness and a small gap on each side. In a 24″ wide, 22 1/2″ deep cabinet the box is 21 1/2″ wide and 22″ long.
    Counter
    Calculator worked hard on projects: 0
    Need help with the terms?
    Practical tips and quick search in the knowledge cards are waiting below.
    Ready-made drawer profiles – pick one and see the result in 3D:
    What are you building with? ?
    Choosing the material is free; your own sheets and edge banding are in PRO.
    Pick a material and the calculator sets the sheet thicknesses and edge banding to match.
    Cabinet construction ?
    A face frame is a frame of stiles and rails on the front edge of the cabinet. Rails sit between the drawers and each drawer runs in its own opening (classic American dresser).
    Hardware ?
    Undermount slides sit under the drawer bottom and are hidden from view. Side-mount slides (ball-bearing, wooden runners or your own) are screwed to the drawer side and need a gap between the drawer and the cabinet; enter their height and thickness.
    Manufacturer ?
    The calculator takes the dimensions, slide lengths, drilling and part number from the manufacturer catalogue.
    Slide Capacity ?
    How much a pair of slides carries, including the drawer and its contents. The calculator picks the slide series and the lengths the manufacturer makes.
    Blum MOVENTO 760H · full extension
    Loading preview...
    Layers
    Drag to rotate, scroll or pinch to zoom.Use two fingers to rotate and zoom.
    +
    -
    +
    -
    +
    -
    Side panel depth (without back)
    +
    -
    +
    -
    +
    -
    Fronts, Drawer Heights & Cabinet Construction Overlay front · Frameless
    +
    CUT LIST & FORMATTING Sheet sizes, edge banding, grain direction and cabinet parts in the cut list.
    +
    Link copied!
    ✕
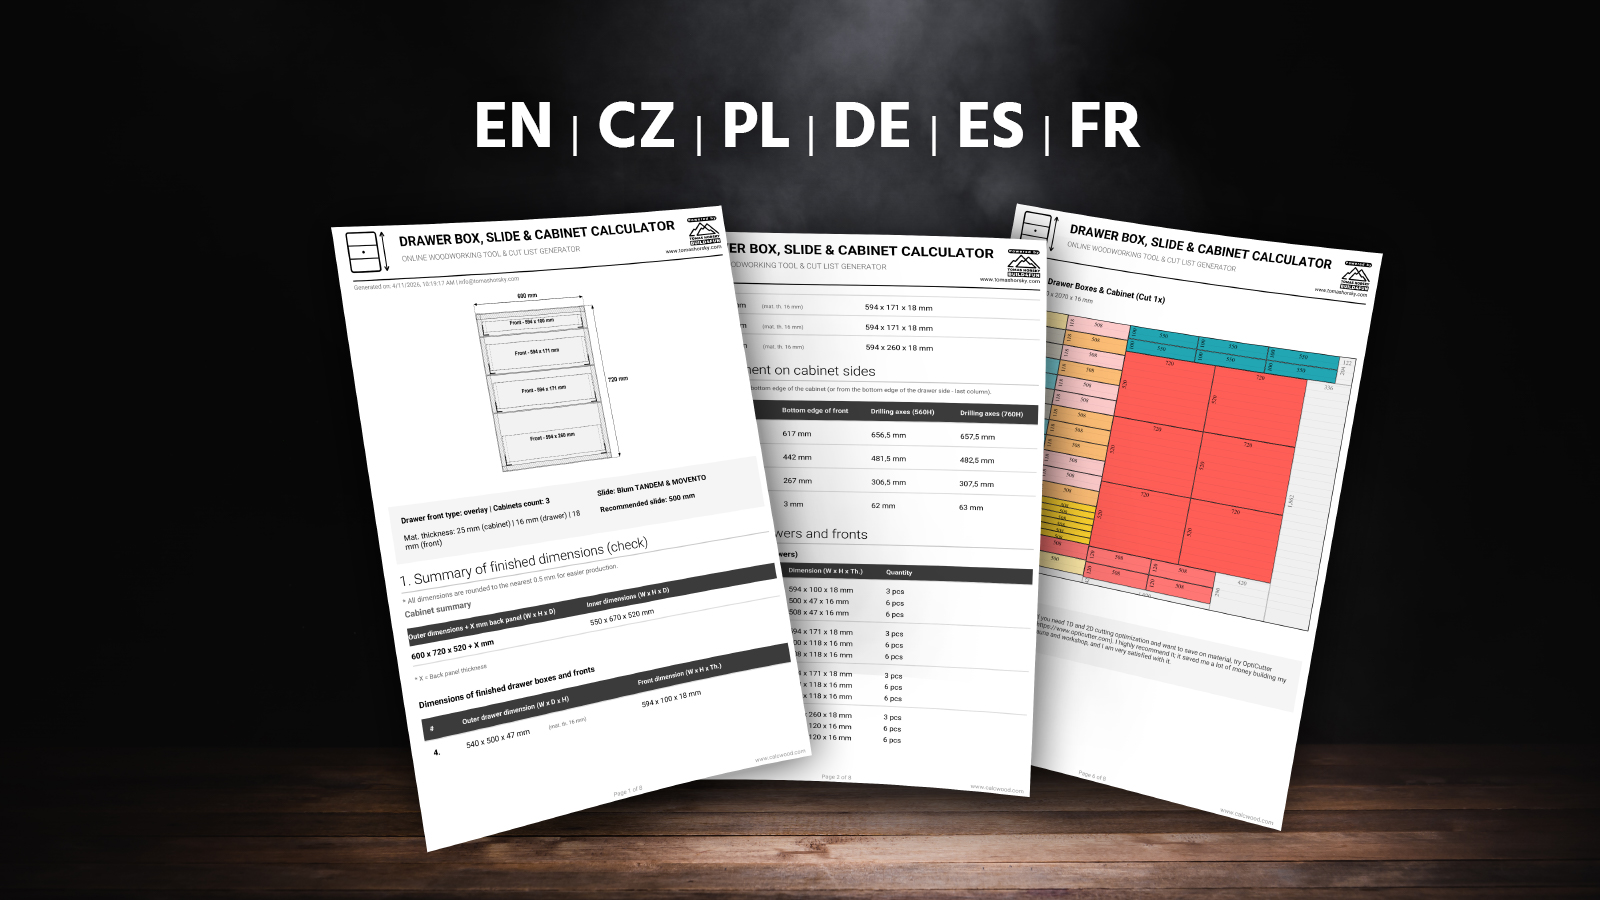
    PDF Preview
    * This is just a simplified sample. Your PDF will contain the exact dimensions for your project.

    How does the drawer calculator help in practice?

    Calculator Overview & Introduction

    Watch a quick overview of why this tool was created and what it can do. The video includes English subtitles (other languages available in player settings).

    Key Features:

    • Blum, Hettich and GTV slides: TANDEM and MOVENTO, Quadro 25, Quadro V6 5D and Actro 5D, Modern Slide 3D. Real lengths, load rating and part number, plus the original page of the installation sheet as a PDF.
    • Thicker side than the slide allows: 18 mm sides on a 16 mm slide: the box stays the same width and the calculator shows the rebate from below on the inside (not recommended by the manufacturer).
    • Smart hints under the fields: They flag a shallow cabinet, a thick side or too little room above the drawer and offer a fix.
    • Side-mount slides and wooden runners: Light, standard or heavy-duty profile, or your own runner size.
    • Overlay & inset fronts: Automatically recalculates all depths and clearances.
    • Individual heights: Enter the height of one front or box and the other drawers are laid out in the remaining space.
    • Up to 6 technical drawings: Fronts, cabinet and boxes, side – drilling, top view, box section, drawer machining. Dimensioned from the cabinet bottom edge, on the web and in the PDF.
    • Cutting plan: Parts laid out on boards, ABS edge deduction, grain direction and a cabinet multiplier for several identical cabinets.
    • 3D preview: The drawers in the cabinet are drawn live. Layers, transparent cabinet, opening playback and part dimensions on hover.
    • Units and saving: Switch between mm and inches (fractions), save your project and come back to it any time.
    • And much more…

    Basic rules and tips for building drawers

    Designing and assembling drawers has clear rules. Here are 21 practical points, ordered from the most important setup decisions to workshop details that save time, nerves, and material:

    Drawer box width for side-mount slidesStandard ball-bearing side-mount slides need 1/2″ (12.7 mm) of clearance on each side. Drawer box width = clear opening width minus 1″. A 21″ opening takes a 20″ wide box (outside width). The calculator uses 1/2″ per side by default. If your slides need a different clearance, change Slide Thickness / Gap.
    Drawer box size for undermount slides (Blum)For Blum TANDEM and MOVENTO the calculator deducts 21 mm (about 13/16″) per side minus the drawer side thickness. The inside width between the box sides is always the opening width minus 42 mm (about 1 5/8″). With 5/8″ sides, the outside box width is the opening minus 10.25 mm (about 3/8″). Box length = slide length.
    Splitting cabinet height into drawersFront height = (cabinet height − 2 × perimeter gap − gaps between fronts) ÷ number of drawers. The calculator starts with a 2 mm (about 1/16″) perimeter gap and 3 mm (about 1/8″) between fronts. Example: a 30″ tall cabinet with overlay fronts and 3 drawers gives three 9 7/8″ fronts. Box height = front height minus the top and bottom overlay.
    Start with the correct cabinet dimensionsFirst decide whether you are entering the outside cabinet size or the clear inside opening. The calculator can handle both. If you already know the inner opening, set cabinet material thickness to 0 so the side panels are not deducted twice.
    Drawings: put the tape on and markBelow the results you get up to 6 technical drawings (fronts, cabinet with drawer boxes, side with drilling axes, top view, box section and, for undermount slides, drawer machining), also in the PDF for the workshop. Every height is measured from the outer bottom edge of the cabinet, exactly like the drilling table. You see where the fronts go, where to drill and how much space is left behind the drawer.
    Exact internal width (LW)With undermount slides, every millimeter counts. Always measure the internal width (LW) after assembling the cabinet. If you are off by more than 1 mm, the slides will rub or won't click in at all.
    Installing Blum for the first time?If you are working with undermount slides for the first time, download the original PDF manual for TANDEM or MOVENTO. You will find all the mounting dimensions there.
    TANDEM vs. MOVENTOTANDEM is a solid base for standard drawers and mainly gives height adjustment. MOVENTO is a more precise and more comfortable solution with higher load options and 4D adjustment. For wide, heavy, or highly visible drawers, MOVENTO usually makes more sense.
    Thicker drawer material than the manufacturer recommendsUndermount slides are made for drawer sides up to 16 mm. Your boards are 18 mm (up to 19 mm works)? The calculator keeps the box the same width, narrows the front and back panels and the bottom, and the Box section and Drawer assembly drawings show the rebate to mill from below on the inside of the side down to 16 mm. The manufacturer does not recommend this.
    Overlay vs. Inset frontAn overlay front covers the cabinet edges and hides small inaccuracies more easily. An inset front sits flush with the cabinet edge. It looks cleaner, but needs a precise square cabinet and well-controlled gaps.
    Gaps between frontsA common front gap is 2 to 3 mm. Too small a gap shows every inaccuracy and fronts may rub. Too large a gap looks cheap. The calculator already includes these gaps when it divides the front heights.
    Card trick for mounting frontsA workshop trick: take an ordinary deck of playing cards, place it in the gap, split it exactly in half, and use it on the left and right, or top and bottom. It helps center the front nicely without complicated measuring.
    Slide length and typeSlides come in 50 mm steps. For an atypical depth, choose the nearest shorter slide – the drawer with the slide must stay shorter than the clear internal cabinet depth. Classic ball-bearing slides mount on the drawer side and need an exact side clearance, typically 12.7 mm on each side: a wider drawer rubs, a narrower one has play.
    Individual front and box heightsIf one drawer needs to be taller, enter its front or box height manually. The calculator redistributes the remaining space automatically. This is useful for a deep bottom drawer with smaller drawers above it.
    How to maximize capacityWith overlay fronts, there is dead space under the drawers. Normally, inner boxes are made the same height to stay interchangeable. If you extend them downward, you gain maximum storage. This calculator can calculate it in the Expert settings.
    Cut list and cabinet quantityIf you are building several identical cabinets, use the cabinet multiplier. The cut list will then calculate all parts for all sets at once. This is more accurate for ordering boards, edge banding, and slides.
    Edge banding and wood grainFor fronts, count with edge banding all around. For drawer boxes and cabinets, usually only visible edges matter. The calculator can use smart edge deduction and keep grain direction on fronts so the decor does not look like random offcuts.
    Large and heavy drawers?For large drawers used for pots, tools, or supplies, choose higher load slides such as 40 kg or 70 kg. But the drawer construction must also carry the load, especially the bottom. You can check deflection in my shelf sag calculator.
    3D preview: check itBefore you cut, rotate the model in 3D, hide the fronts or cabinet and play the opening. You will see at once whether drawers, slides and bottoms fit as expected.
    Groove for the bottomRout the groove through both sides, the front and the back panel. Width = bottom thickness + 0.5 mm, depth 1/3 to 1/2 of the side (max 8 mm). Make the bottom 1 mm shorter per side and leave at least 10 mm of side above the groove.
    Blum: back panel and bottomWith Blum the bottom sits 13 mm above the lower edge of the sides and the runner travels below it. Either groove the back panel and notch it at the bottom next to the sides for the runner end, or make it lower so it sits on the bottom – then no groove or notch is needed. Check the exact size in the instructions for your type (TANDEM / MOVENTO).

    Frequently asked questions

    All questions on the FAQ page
    How wide should a drawer on wooden runners be?

    Take the inside width of the cabinet and subtract the runner thickness and a small gap on both sides, so the drawer does not bind. In a 24″ cabinet the box is 21 1/2″ wide.

    How long should wooden drawer runners be?

    Make the runners and the box about as long as the usable depth of the cabinet. In a 22 1/2″ deep cabinet the calculator uses 22″ (559 mm) runners and a 22″ long box.

    Wooden runners or metal slides?

    Wooden runners are cheap and quiet, but the drawer does not open all the way and the runners need wax to stay smooth. Ball bearing slides give full extension and carry more. Switch the slide type in the calculator to compare both.

    What is CalcWood Master and what does it check in the drawer calculator?

    CalcWood Master checks the specific calculated result using fixed rules linked to the entered dimensions and selected hardware. It can highlight drawers that are too wide, unsuitable slide load capacity, or unused space below the drawers, and recommend what to adjust or verify before manufacturing. It is not artificial intelligence and does not replace the final dimension check. It is a practical rule-based check designed to reveal risk areas before you cut the material.

    Does the calculator show me exactly where to measure and drill?

    Yes. Below the results you get up to 6 technical drawings: fronts, cabinet with drawer boxes, cabinet side with drilling axes, top view, box section and, for undermount slides, drawer machining (hole for the slide hook, notch in the back panel). All heights are dimensioned from a single zero point – the outer bottom edge of the cabinet – exactly like the drilling table, so you can put your tape measure on and mark right away. They also show the drilling axis on the drawer side, slide clearance, cabinet side thickness and depths including the space behind the drawer. The same drawings are included in the PDF, ready to print for the workshop. Everyone can see the drawings for free; PRO unlocks all production dimensions in them.

    How does the 3D drawer preview work?

    The 3D preview is drawn live from your inputs – every change of dimensions, slides, fronts, bottom or cut list settings (full top, stretcher rails, ABS edges) shows up immediately. In Layers you can hide the cabinet, fronts, drawers, bottoms or slides, make the cabinet transparent and play the drawer opening with ▶. Hover a part to see its name and size; clicking a result card highlights the part in 3D. Older devices without WebGL automatically get the 2D sketch.

    How big should the groove for the drawer bottom be?

    The groove runs through both sides, the front and the back panel. Width = bottom thickness + 0.5 mm, depth 1/3 to 1/2 of the side thickness, max 8 mm. The bottom is 1 mm shorter per side than the groove depth and at least 10 mm of side should remain above the groove. The calculator uses this for the bottom size in the cut list and PDF and dimensions the groove in the Box section drawing. With Blum the bottom is fixed 13 mm above the lower edge of the sides. There are two common ways to make the back panel: grooved like the other parts (with Blum, notched at the bottom next to the sides for the runner end), or lower, sitting on top of the bottom – then it needs no groove or notch and the bottom slides in from the back. The calculator uses the first option.

    How to fit drawers into an existing cabinet (I only know the inner dimensions)?

    If you already have a built cabinet and know the exact inner space (clearance), it's easy. Enter your inner dimensions into the main fields for outer width and height, and set the "Cabinet Mat. Thickness" to 0. This tricks the calculator into not deducting anything, and it will calculate the drawers perfectly for your opening.

    How does the Opticutter work?

    Opticutter is an integrated tool that calculates a highly efficient way to cut your parts from a sheet of material. Depending on settings, it also accounts for edge banding and saw blade thickness.

    How does the calculator handle ABS edge banding?

    I use a smart deduction system. For drawer fronts, the edge thickness is deducted from all 4 sides (2x thickness). However, for cabinet parts and drawer boxes, it is only deducted from the visible front edges (1x thickness) to maintain the exact lengths required for the hardware.

    My drawer material is thicker than the slide manufacturer recommends (18 mm instead of 16 mm). What can I do?

    The calculator handles it. Undermount slides (Blum, Hettich) are made for drawer sides up to 16 mm. If you enter 18 or 19 mm, I keep the box as wide as with a 16 mm side, so the slide and the gap to the cabinet side still fit. The front and back panels and the bottom get narrower by the difference, and the Box section and Drawer assembly drawings show where to rebate the side from below on the inside down to 16 mm (a 2 × 13 mm rebate for an 18 mm side). The manufacturer does not recommend this; it is a workshop practice. The calculator does not allow sides thicker than 19 mm.

    How to maximize storage space with overlay fronts?

    Overlay fronts create a dead space under the drawers. Normally, inner boxes are made the same height for interchangeability. But if you extend them downwards, you get maximum space. The calculator can do this automatically - just select "Maximize drawer capacity" in the Expert Settings.

    Why are my undermount slides rubbing or the front not sitting flush?

    The most common mistake is poor squareness. Always measure both diagonals when assembling the drawer box. They should be as equal as possible – ideally within one millimeter. The inner cabinet width (LW) also plays a role – if you are off by more than 1 mm, the slides will rub.

    What is the best way to set equal gaps between drawer fronts?

    The standard gap is 2 to 3 mm. A workshop trick: Take a standard deck of playing cards, divide it exactly in half, and place them on the left and right (or top and bottom). This centers the front perfectly without complex measuring.

    What slide length should I choose for a non-standard cabinet depth?

    Slides are manufactured in standard lengths (usually in 50 mm increments). If you have a non-standard depth (e.g., 470 mm), go for the nearest shorter one (450 mm). Golden rule: the entire drawer with the slide must be 10–15 mm shorter than the inner clear depth of the cabinet so it doesn't hit the back.

    What is the difference between an overlay and an inset front?

    An overlay front covers the cabinet edges and easily hides minor inaccuracies. An inset front is flush with the cabinet edge – it looks premium but requires absolutely precise assembly and a perfectly square cabinet.

    I need one drawer taller than the others. Is that possible?

    Yes. In the “Individual FRONT Heights” section, enter the required height for that drawer and the calculator automatically distributes the remaining space between the others. Fronts, drawer boxes and the cut list are recalculated together. Individual heights are part of PRO.

    I am building several identical cabinets. Do I have to calculate each one separately?

    No. Enter how many cabinets you are building in the “Number of Identical Cabinets” field and the calculator multiplies all parts in the cut list by that number. This feature is part of PRO.

    Ratings & Reviews

    Checking calculator ratings...
    Loading reviews...
    ✕

    Did the calculator help you?

    Your feedback helps improve CalcWood for all woodworkers and DIYers around the world.

    UPDATES & CHANGELOG
    +
    v1.6 ( November 2026)
    • Face frame cabinets: the calculator works out the stiles, rails and slide spacers, with drawings, 3D and PDF.
    • Shopping list on the page and in the PDF: sheets, slides and hardware, with a Buy button for Blum and Hettich (Czechia and Slovakia).
    • New drawings under the results and a Parts and drilling tab: every part on its own sheet with dimensions, printable part labels.
    • New PDF with the same drawings as the page, CalcWood Master warnings and the slide part number, in inches on US Letter.
    • What are you building with? Pick the material and the calculator presets the sheet sizes and edging in the cutting plan.
    • Slides from the Blum, Hettich and GTV catalogues: pick the brand and load rating, and the calculator sets the clearances and box length for you.
    • Hints right under the fields: you see at once when the cabinet is too shallow for the slide, the drawer side too thick or there is not enough room above.
    • Works with 18 mm sides on slides made for 16 mm: the box keeps its width and the drawing shows where to rebate the side from below.
    • Drawer bottom for GTV Modern Slide as specified by the manufacturer.
    v1.5 ( October 2026)
    • 3D preview of the drawers drawn live from your inputs: layers (cabinet, fronts, drawers, bottoms, slides), transparent cabinet, opening playback from the bottom up, preset views, full screen and part labels with dimensions. Result cards highlight the part in 3D.
    • The 3D model also follows the cut list settings: full top or stretcher rails and ABS edges according to the smart deduction.
    • New drawer bottom settings: thickness auto 6/8 mm or custom, offset from the lower edge (13 mm for Blum), bottom in a through groove, Blum back panel notch for the runner and a check that the bottom fits.
    • Bottoms in the cutting plan with their own board and in the PDF (per drawer, summary, boards to order), Bottom card in the results.
    • New Box section drawing with the dimensioned groove and bottom, 3D image on the first PDF page.
    • Fix: restoring the defaults after opening a shared link gives a free result again.
    v1.19 ( October 2026)
    • New technical drawings below the results in 4 tabs: Fronts, Cabinet & boxes, Side – drilling and Top view. Free for everyone.
    • Dimensions from the zero point (outer bottom edge of the cabinet) matching the drilling table: bottom edges of fronts and drawers, drilling axes on the cabinet and on the drawer side, Blum runner bottom edge.
    • Chain dimensions of front and side heights, widths, slide clearances, cabinet side thickness, slide depth and the space behind the drawer split into unused space and rear reserve.
    • PDF export: page 1 shows an overview sketch in the same drawing style with a correct aspect ratio, followed by 2 print pages with all 4 drawings after the drilling layout.
    v1.18 ( October 2026)
    • The metric and imperial unit switch is now available in every language version of the calculator.
    • Switching units preserves the drawer count, expert settings and individually adjusted dimensions. Unchanged values return to their original units without losing precision.
    • Every user-modified value is highlighted in yellow, making it immediately clear which dimensions were set manually and which remain automatic.
    v1.17 ( September 2026)
    • Improved individual front and drawer box input using consistent numbering from bottom to top.
    • The same numbering is now used in the input form, visual preview, results and PDF export.
    • Calculation and validation logic was improved to handle unusual or physically impossible values more safely.
    v1.16 ( September 2026)
    • Added a new “Quick workshop result” block directly above the detailed calculation results.
    • The summary now instantly shows the recommended slide, front dimensions, drawer box dimensions and the number of slide pairs to buy.
    • This block works as a quick workshop card: the most important production dimensions are visible immediately, without scrolling through the full drilling and position breakdown.
    • The summary respects both the number of drawers and the number of identical cabinets, so total parts and slide quantities are shown correctly.
    v1.15 ( June 2026)
    • Added full fraction support for the imperial system (inches). When you switch the calculator to inches, all results and PDF exports are now automatically displayed in easy-to-read fractions (up to 1/16 inch precision).
    • Decimal numbers entered as input are automatically converted to the nearest practical fraction, making workshop tasks much easier.
    v1.14 ( May 2026)
    • Improved stability of the visual preview when loading a shared URL.
    • Fixed display of material thickness limits when using imperial units (inches).
    v1.13 ( April 2026)
    • Added a new "Maximize drawer capacity" feature in the expert settings.
    • This function allows you to utilize the dead space under drawers when using overlay fronts and thick cabinets. Inner boxes are automatically extended downwards to maximize storage space.
    • Updated and clarified tooltip texts for a better understanding of the calculator's behavior.
    v1.12 ( March 2026)
    • Added the option to choose the cutting layout method: "In strips" (easier cutting on a panel saw) or "Tetris" (maximum material yield).
    • Major optimization of the sharing URL – thanks to shortened parameter names and smart rounding, the link is now approximately 50% shorter.
    • Completely reworked calculation sharing on mobile devices – now uses native phone sharing, solving the issue with long URLs being cut off in apps (e.g., Messenger).
    • Fixed an issue with URL parameters being cut off when sharing to Facebook.
    v1.11 ( March 2026)
    • Added the ability to include cabinet parts directly into the cut list (choice between a full top panel or support rails).
    • New features for easily sharing a specific calculation (URL link and social media icons) have been moved to the main panel and are now unlocked for all users.
    • Optimized the graphical layout of the export and sharing buttons – cleaner display on desktops and perfect adaptation for mobile devices.
    • Added explanatory tooltips to the new cut list settings to make it easier to understand which parts are calculated.
    v1.10 ( March 2026)
    • Added a new graphical cutting plan feature directly into the exported PDF.
    • Partnered with OptiCutter to provide highly efficient cutting optimization (material yield over 90%).
    • Added the option to maintain wood grain direction for drawer fronts in the cutting plan.
    • Ability to define custom board sizes (separately for fronts and drawer boxes).
    • New input for ABS edge banding thickness (the calculator automatically deducts the edge from the cutting dimensions).
    • Overall redesign and improvement of the exported PDF document for maximum clarity in the workshop.
    • Added a multiplier (repeater) function for the cutting plan – easily generate parts for multiple identical drawer sets.
    v1.02 (March 2026)
    • Added support for 0 mm cabinet material thickness (outer dimensions now equal inner dimensions).
    • Fixed handling of zero thickness in JavaScript and corrected its display in the PDF export.
    • Complete fix for tooltip centering on mobile devices.
    • Improved logic for displaying right and left columns.
    • Updated and expanded tooltips for input fields.
    • Added automatic values (Inner dimensions) below the Outer cabinet width and height fields.
    v1.01 (February 2026)
    • Added new modern Dark-mode design for the calculator.
    • Improved expert settings functionality for professionals.
    Have a suggestion or found a bug?
    +

    Related calculators

    Work this out too

    What I use for this

    The tools I use for this in my own workshop.

    All my tools →

    When you buy through a link, you support the development of CalcWood. It costs you nothing extra.

    Plans to build it yourself

    Build it yourself. With plans where every part is dimensioned.

    New 3D model PDF in English 44 A4 sheets

    Multifunction workbench

    One rolling bench for your table saw, router and assembly work. The saw sits flush with the top, so you get a big flat surface around the blade, and the whole bench rolls wherever you need it.

    • Fits 5 table saws: Bosch, Metabo, DeWalt, Festool, HiKOKI
    • 2 versions: with saw and router, or without machines
    • Material list and sheet cutting plan, so you buy only what you need
    • Dust collection for saw and router hidden in the walls, plug the vacuum in from outside
    • 10 drawers, adjustable shelf under the saw
    • Step-by-step build
    Price BLACK FRIDAY −30%$36.90 $25.83
    See the plans →